Friday, December 11, 2020

Tilda Birds Quilt


I am delighted to see my Tilda Birds quilt looks equally at home on the heirloom couch as it does on our lounge- it’s a keeper! The zigzag edges on the long sides were tedious to figure out and attach but I am so pleased I persevered, it’s now my favourite feature of the quilt. 

Tilda Birds was started last year, primarily as a portable English Paper Piecing (EPP) project to stitch while away from home with our children’s sport. The inspiration came from some beautiful Tilda fabric I saw on the Instagram feed of @samanthamackie31 , which worked perfectly with the Tilda birds prints I had purchased a few years ago. I chose the hexagon size to best work with these prints. The design is based around hexie flowers with a Tilda bird as the centre of each. There are two ‘joiner/spacer’ hexies in a neutral crosshatch design added to each flower. 


I bought my hexagons from Jodi's shop, Tales of Cloth, here in Australia, they are 1 3/4" as measured along each side. I love Jodi's recycled paper pieces, finding them a great weight to work with. 


I chose a Decor pastry storage container to house my project as it was the perfect size and acts as a lap table when stitching away from home. An empty slimline chocolate box works perfect for portable basting as it fits in the pastry storer but can also easily slide into my handbag, just in case I have a little stitching time. Each hexagon was thread basted with a little backstitch through the fabric only at each corner on the back. This way the basting thread can remain in place after popping/pulling out the papers, keeping the back very tidy.


 I made my own clear template from stiff clear plastic to assist in centring the birds, allowing me to draw an outline ready for cutting. 


The blocks slowly added up to become a nice stack. They were safely stored away in a cupcake container for many months while I turned my attention at completing the long promised Dancing Waters quilt for my good friend Sue, followed by a long term EPP - Ice Cream Soda quilt. Soon I found a rhythm of working with both my newer Cornflower/Joyfully quilt and this Tilda Birds quilt. With more time at home due to COVID, I made the most of the extra stitching time, especially for the less appealing cumbersome stage of sewing the blocks together into a quilt top. 


It is my preference to complete any hand quilting during the cooler months, usually of an evening when our dining table is free. Finally all the diagonal quilting lines were completed in one direction and then the other, resulting in a pleasant textured diamond pattern. 


The zigzag binding was perhaps the most challenging step as it was very much slower and more tedious than regular straight binding, and I had to figure out how to actually do it. I was very much tempted to cut all those points off at one stage, however it was well worth the extra attention in the end.


 Here are the three EPP, hand quilted finishes for this year, along with a glimpse of an outfit I made to wear to our eldest daughter's wedding in June. It really has been a rather rewarding year of finishes, each quilt is rather different in design and colour palette too. I wonder what next year will hold.....definitely some Sunshiny Day with Jodi 😊 


Quilt Details
Tilda Birds Quilt
Finished quilt measures 55" x 74"
140 cm x 188 cm
Started: May 2019
Finished: October 2020
1 3/4" (1.75") hexagon paper pieces from Tales of Cloth
Cotton fabrics - many by Tilda 
Batting: Legacy Bamboo Blend
(50% Viscose Bamboo, 50% Cotton)
Quilting thread: Sulky 12 wt #1071

Monday, October 12, 2020

Joyfully Quilt - Cornflower Quilt


I have a new favourite quilt, just finished on the weekend! In fact I love it so much I have chosen a special name for my smaller version of Jodi's Cornflower quilt. It's my Joyfully quilt. Just like my previous finish (Ice Cream Soda Quilt), it is entirely hand sewn using the traditional English Paper Piecing method and was designed by Jodi Godfrey of Tales of Cloth.


This design, along with many others, can be found in Jodi's book, The Seedling Quilts. I love the design of each of the two different blocks, and the interplay of pattern and shape when they are placed together. The sparkling petals of each cornflower block are surrounded by bright near-solid prints, while their various deep blue/black centres provide unity and an anchoring point. Set against two shades of aqua they make my heart happy. The smaller star blocks are so cute, measuring only 10cm/4 inches per side. The deep teal green of the star blocks and binding helps ground the quilt. 


As Jodi began sharing her new quilt designs around the time of her book's release in August 2019, this one stood out to me. I ordered a copy of the book from Jodi, along with the Cornflower kit, which contained all the paper pieces (some were unusual sizes and not available individually), and a set of templates - my first ever quilt kit purchase.

The freshness of the colours in Jodi's Cornflower quilt greatly appealed to me, so I ordered the same Free Spirit solids as she had used - Aqua, Caribbean and Baltic. Then it was time to start searching through my fabric collection to choose suitable pieces for each section. As usual, some of my original choices were removed as I perceived which shades and prints best aided to the overall effect I was aiming for. It's a great project for selectively using small scraps as only tiny bits are needed.

Having two shades of aqua to choose from for the outer ring of each large flower block allowed for a more harmonious finish. Most blocks looked far better against either the lighter or darker shade. There were a few blocks which looked good against both aquas, so I alternated both shades around their edges. The use of two shades through out the quilt adds more colour options as well as providing a greater sense of movement - and keeps the eye guessing as it looks for patterns and points of interest. Similarly, I chose eight blue/black prints from my stash for the deep blue centres of the large blocks - and one of those fabrics (Land Art - Fairy Circles in Navy) provided many different looks with a little fussy cutting.


Another fun aspect of creating this quilt was the opportunity to be totally scrappy or creating unity amongst the 'petals' of each large block. For some I used eight different colours and fabrics, others had two main colours, some had two feature colours with alternating petals of contrasting low volume. Two blocks have all petals of the same fabric. The centre block is one of these 'mono-fabric' blocks, however the fussy cutting again creates a unique block.


Several of my EPP projects have been started in response to upcoming travel/holiday plans. I like to do something creative with my hands every day, even if only to wind down for a few minutes before bedtime (hello basting). When I know there will be time away from home, one of the the first things I like to plan is a portable creative project- and for the last 10 years, EPP has been my first choice. We knew we had a long family road trip commencing late October 2019, so the race was on to have my fabrics were selected, cut and ready to take with me. The small star blocks are especially compact and portable and were my companion, not only on our road trip, but also when away for our children's state and national cricket championship weeks as well as their regular half day matches. I soon designated it as my 'away from home' project. Kitchen containers of various sizes are my project storage choice, keeping everything neatly protected and packable with their lids doubling as a lap tray.


However with the arrival of Covid-19 our times away from home all but disappeared. This project was too cheerful to let linger, waiting for life to return to normal. After finishing one long term EPP quilt (Ice Cream Soda Quilt) and completing another to its current hand quilting stage (Tilda Birds quilt), I decided it was the right time to pick this one up again.

The pattern for the Cornflower quilt finishes at six blocks square. Aesthetically I prefer to have a definite centre block with this pattern and I was beginning to exhausting my on-hand fabric options. I also was more than happy to have a lap quilt size with the option of it being a wall hanging, so it was an easy decision to finish it at five blocks square.


Gathering some momentum, the piecing of the top was finished just in time for our two week Spring homeschool break (a realistic deadline is good incentive for me). The task of completing the quilt was a great at-home holiday project, spurred on by wishing to complete the hand quilting before the heat of our long summer arrives. Again I followed Jodi's choices in hand quilting - with an all over uneven diagonal grid, quite a fast option too. I selected a wadding/batting with scrim to provide stability for the larger quilting free areas. Thankfully I had yardage of a suitable backing fabric purchased years ago - in fact it was almost too pretty to use as a backing, yet a good way to include it as part of a loved quilt.


It was a great feeling to complete the binding over the weekend, before school term begins again today. My Joyfully quilt will live in our main open plan living area all year round - adding pops of joyful colour to my surrounds every day. Thankfully it seems to be a favourite with the rest of the family too. 😊


Quilt Details
Joyfully Quilt
Quilt designed by Jodi Godfrey of Tales of Cloth
Adjusted to be 5 x 5 blocks instead of 6 x 6 blocks
Finished quilt measures 49 inches (125cm) square 
Started: September 2019
Finished: October 2020
Wadding/batting: Legacy 100% cotton with scrim
Quilting thread: Sulky 12 wt cotton #1046


December 2020 UPDATE:
 I had a recent email enquiry regarding order/process of making this quilt. Here is my response which may be helpful if you are wondering how to start your own Cornflower quilt.  :)

 I began by buying the solids I planned to use, then sorting through my fabrics and making piles for possible petals and star segments, another group which were patterned ’solids’ for the squares around the outer ring and a third group of dark blue candidates for the centres. I cut and basted maybe about a third of what I would need then began stitching, fine tuning as I went. 

With the smaller star blocks I mostly alternated a low volume with a bright colour as I stitched the pieces together - or a variety of colours for contrast in each star. I soon saw which fabrics worked best to give the effect I wanted while setting some others aside. The stars proved to be the perfect project to work on when away from home.

For the larger flower blocks I would work on each one individually - starting with the patterned ‘solid’ squares, I would then select which fabric petals suited the ’solid’ squares best. I would lay them all out together on a flat surface then choose which of my dark blue centre pieces looked best in that middle. I would often take a photo to double check it looked good and to remember which order to stitch the petals. Then I would stitch the petals to the centre and work out from there.

I hope this provides you with an idea of how you can stitch yours, however you may find another order suits you better. Happy stitching!

Friday, August 21, 2020

Ice Cream Soda Quilt - Finished at Last


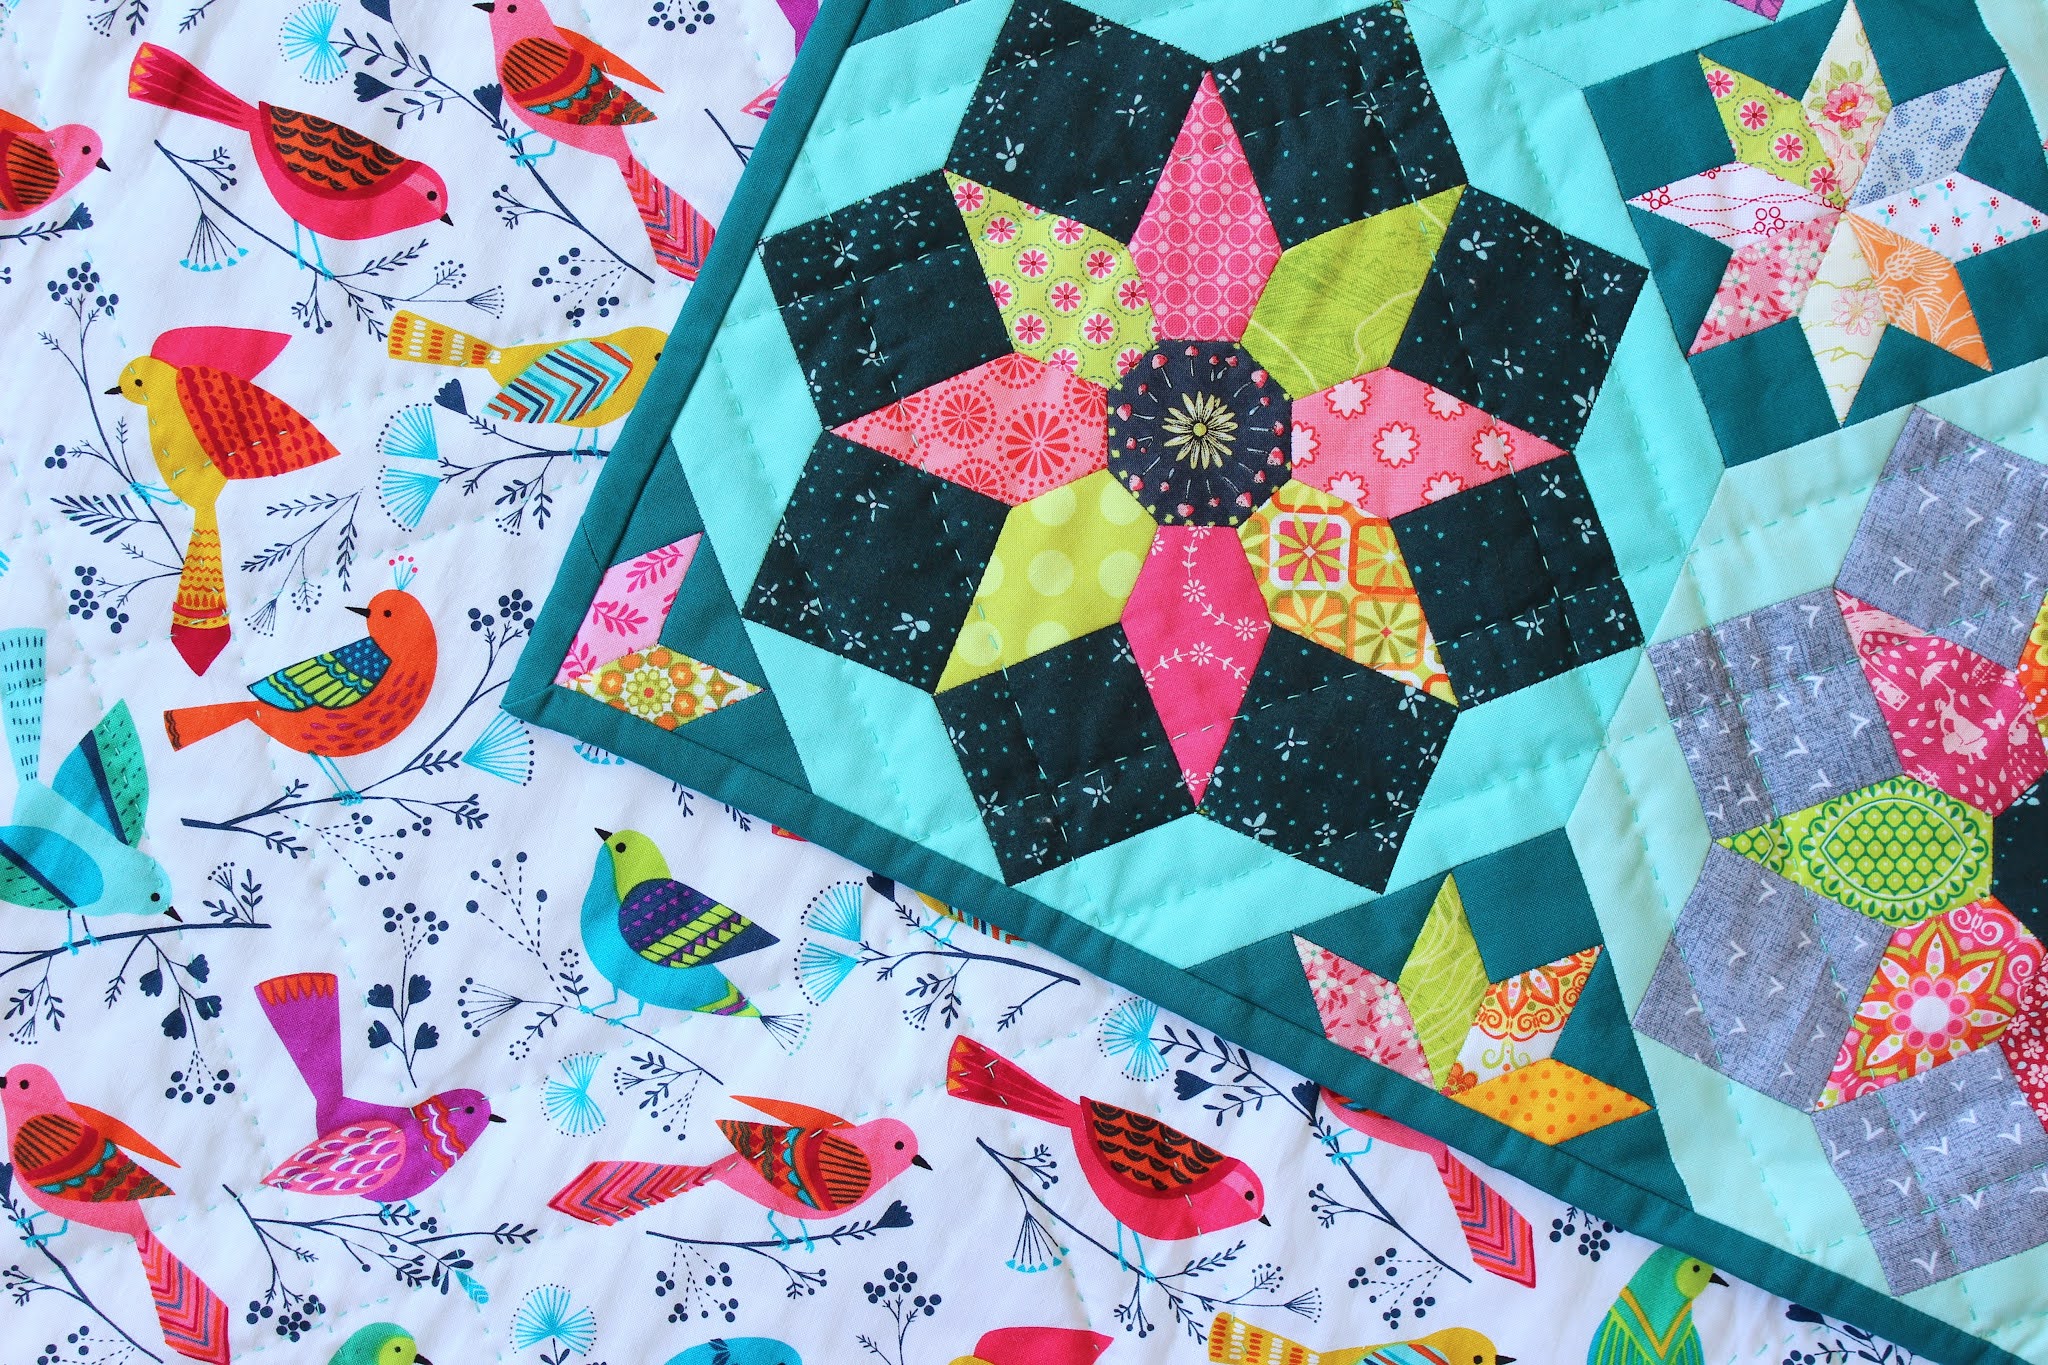
I was NOT going to make an Ice Cream Soda Quilt! I had planned to only sew two blocks with Jodi's trial sample offer back in January 2017. This new English Paper Piecing (EPP) design would be a nice holiday diversion to hand stitch and a chance to see first hand what Jodi's recycled paper pieces (Tales of Cloth) were like.


These two blocks above were soon completed and only enticed me to make more! The creative possibilities of fabric choice and intricate fussy cutting made this design very appealing. I also had lots of fun taking photos of many individual blocks along the way. Each block was told its own story and was a satisfying mini-finish as the months passed in 2017 (several can be found in my blogposts during 2017). 


The end of 2017 saw the unexpected passing of my Mother-in-Love, which set of a cascade of events and life changes. Very little sewing occurred during the following 12 months as most of my time and energy was required to deal with life's essentials.


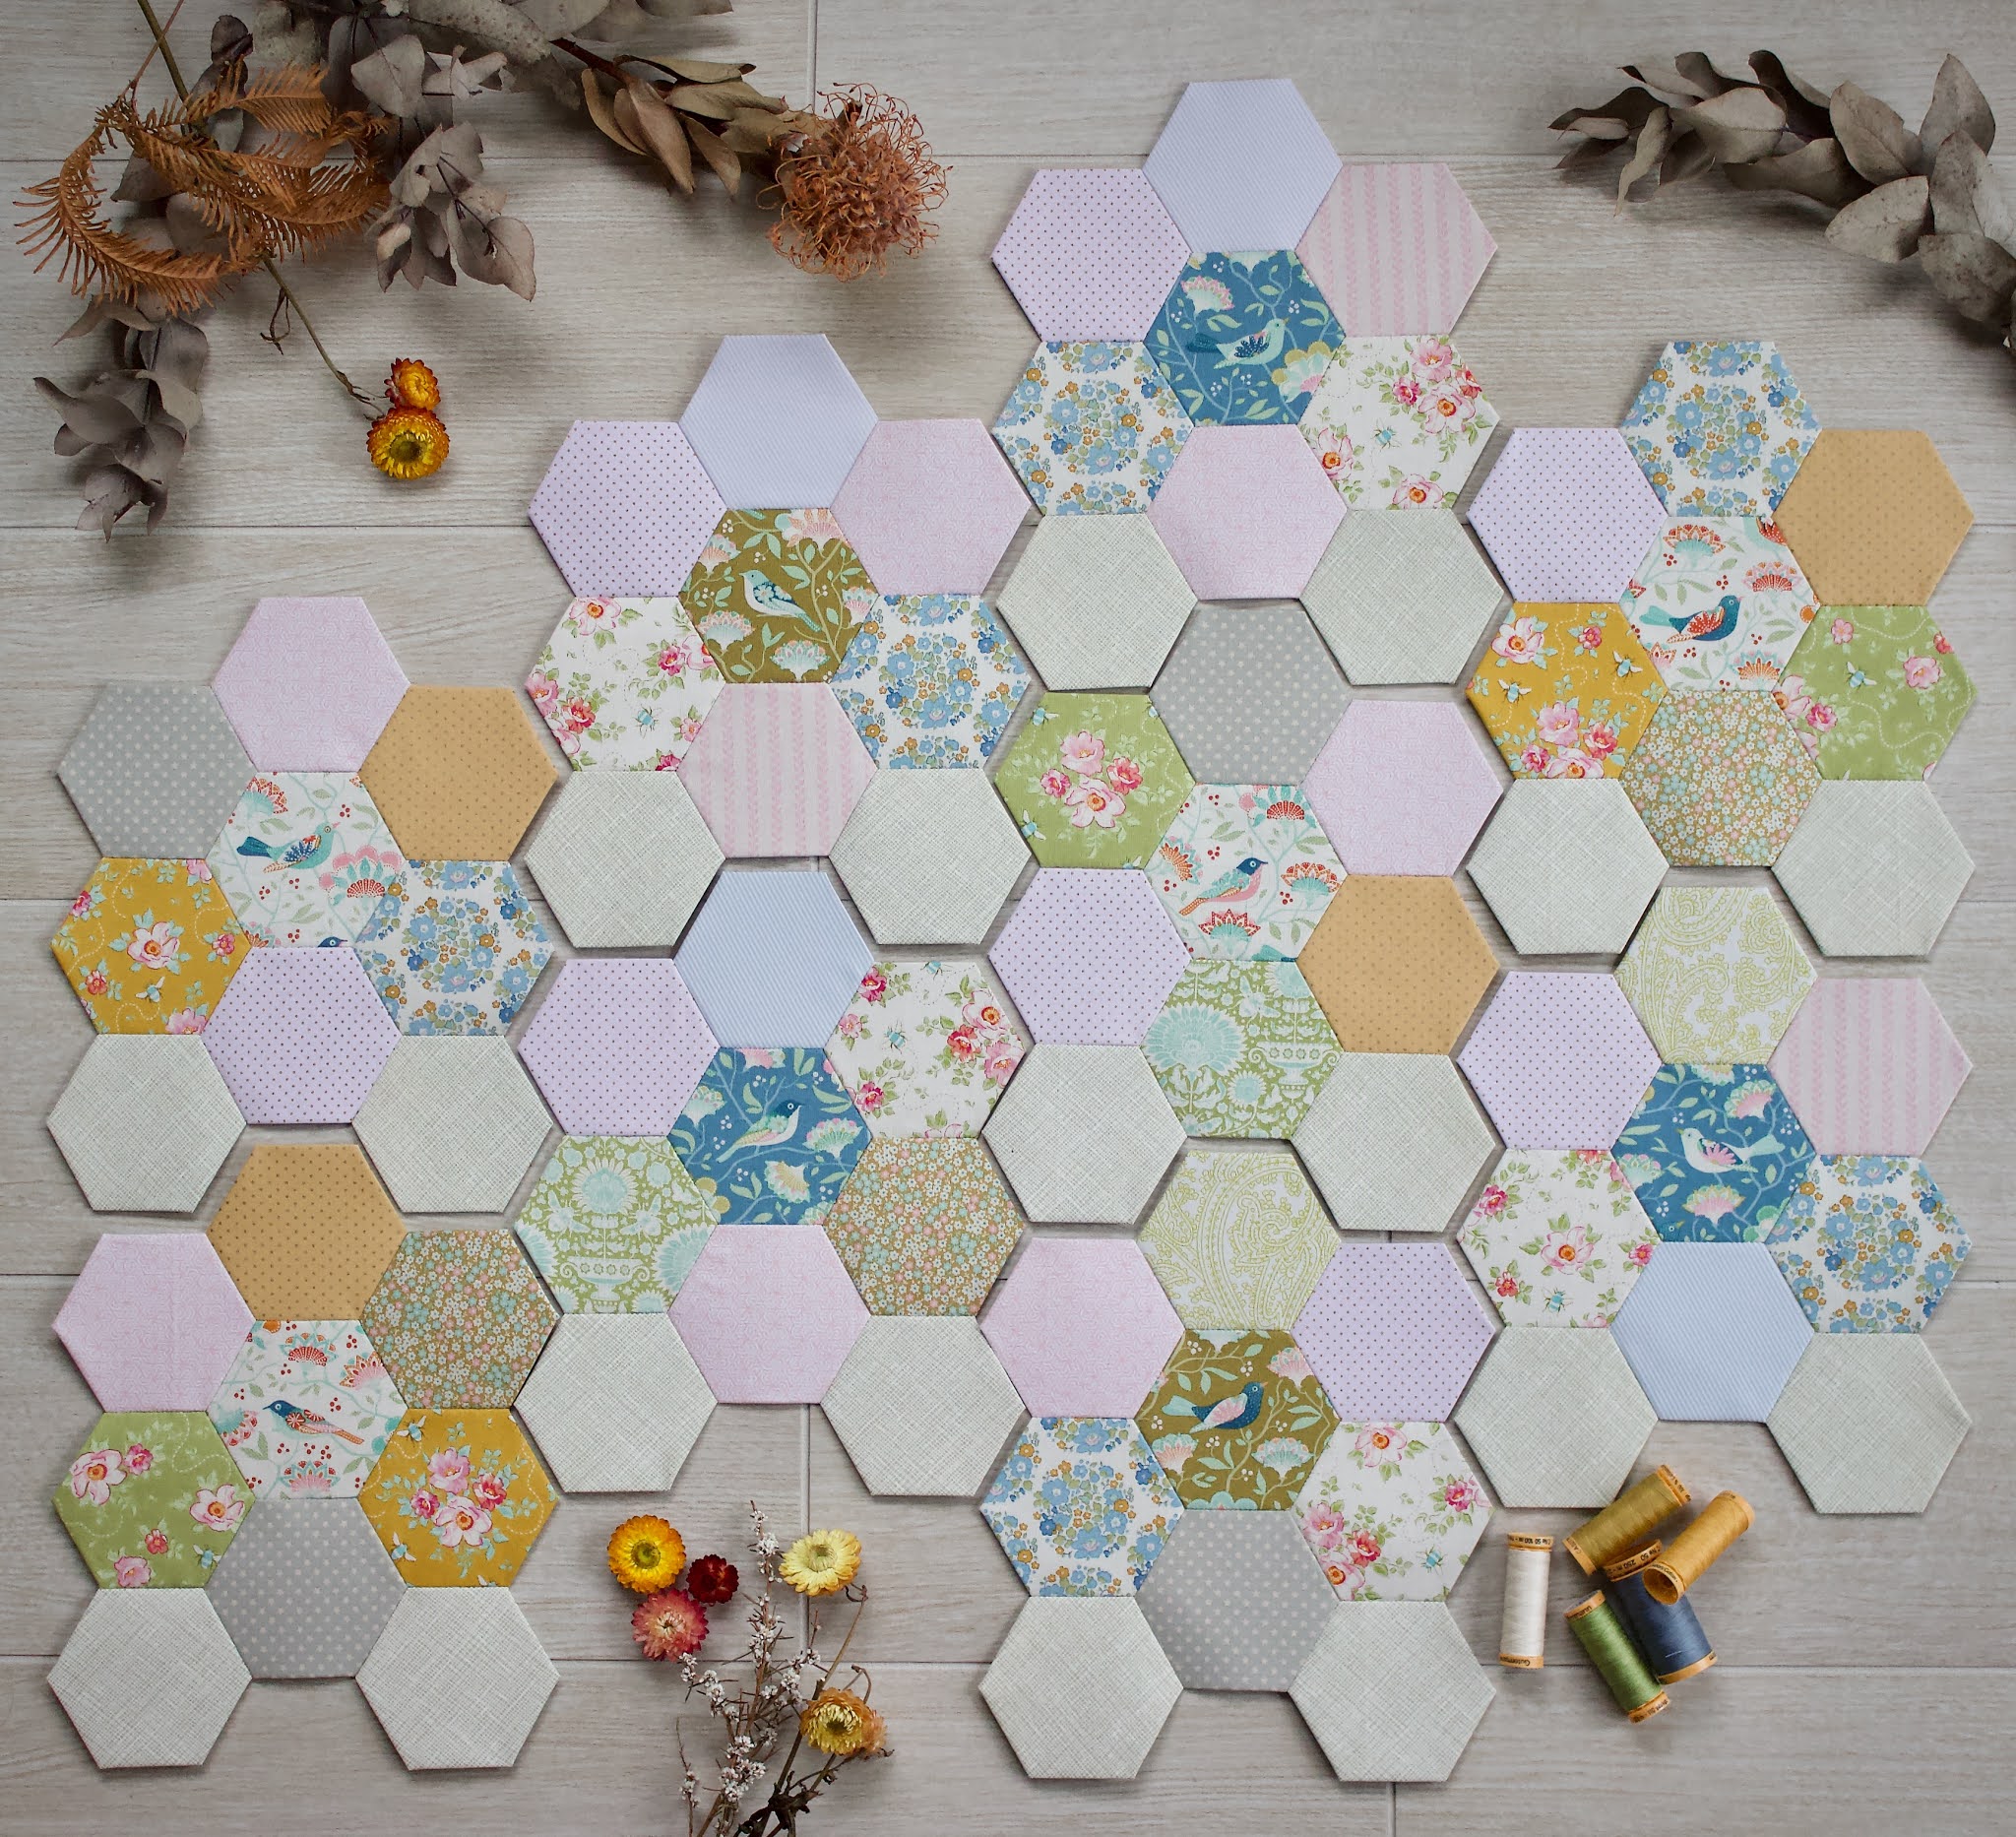
A few new blocks were added in 2019 and I made some further progress in adding more setting/joining pieces. In 2017 I realised my blocks looked better with more spacing than in Jodi's original pattern. I experimented with various options for setting fabric and shapes, eventually choosing a mid-grey solid and using one inch hexagons combined with a truncated triangle shape which I self-drafted and cut from copy paper (Jodi sometimes has this shape in her shop).

Being unsure how large my quilt would become, I purchased my individual shapes (2 inch Crowns, 1 inch 6 point diamonds and 1 inch Kites) from Jodi's shop as I needed them. To assist with fussy cutting I cut my own thin plastic templates. As I used a Sewline glue pen, most of these paper shapes are still usable for any future projects. I prefer to use Straw Needles, size 11, for EPP and  whatever thread I have on hand (Gutermann cotton, polyester or Extra Fine polyester) whichever is the closest match in colour to the darker fabric I am stitching.


It was fun stitching a last block this year using fabric from Sue's Dancing Waters Quilt.


In April I spread out my completed blocks to realise I now had more than enough for a decent size quilt. After fiddling with my layout and removing any blocks which didn't visually fit, it was time to start stitching. During our Easter homeschool holiday break I worked hard sewing the blocks into rows which were then stitched together with the goal of having this quilt ready for hand quilting in our cooler mid-year months. This quilt has fewer blocks than Jodi's original and I didn't sew any half blocks, instead opting to have more flexibility when arranging my blocks, trimming off the excess along the top and bottom once my stitching was complete. 


The papers were removed, the quilt panel was trimmed square before I added borders, again varying from Jodi's pattern. 


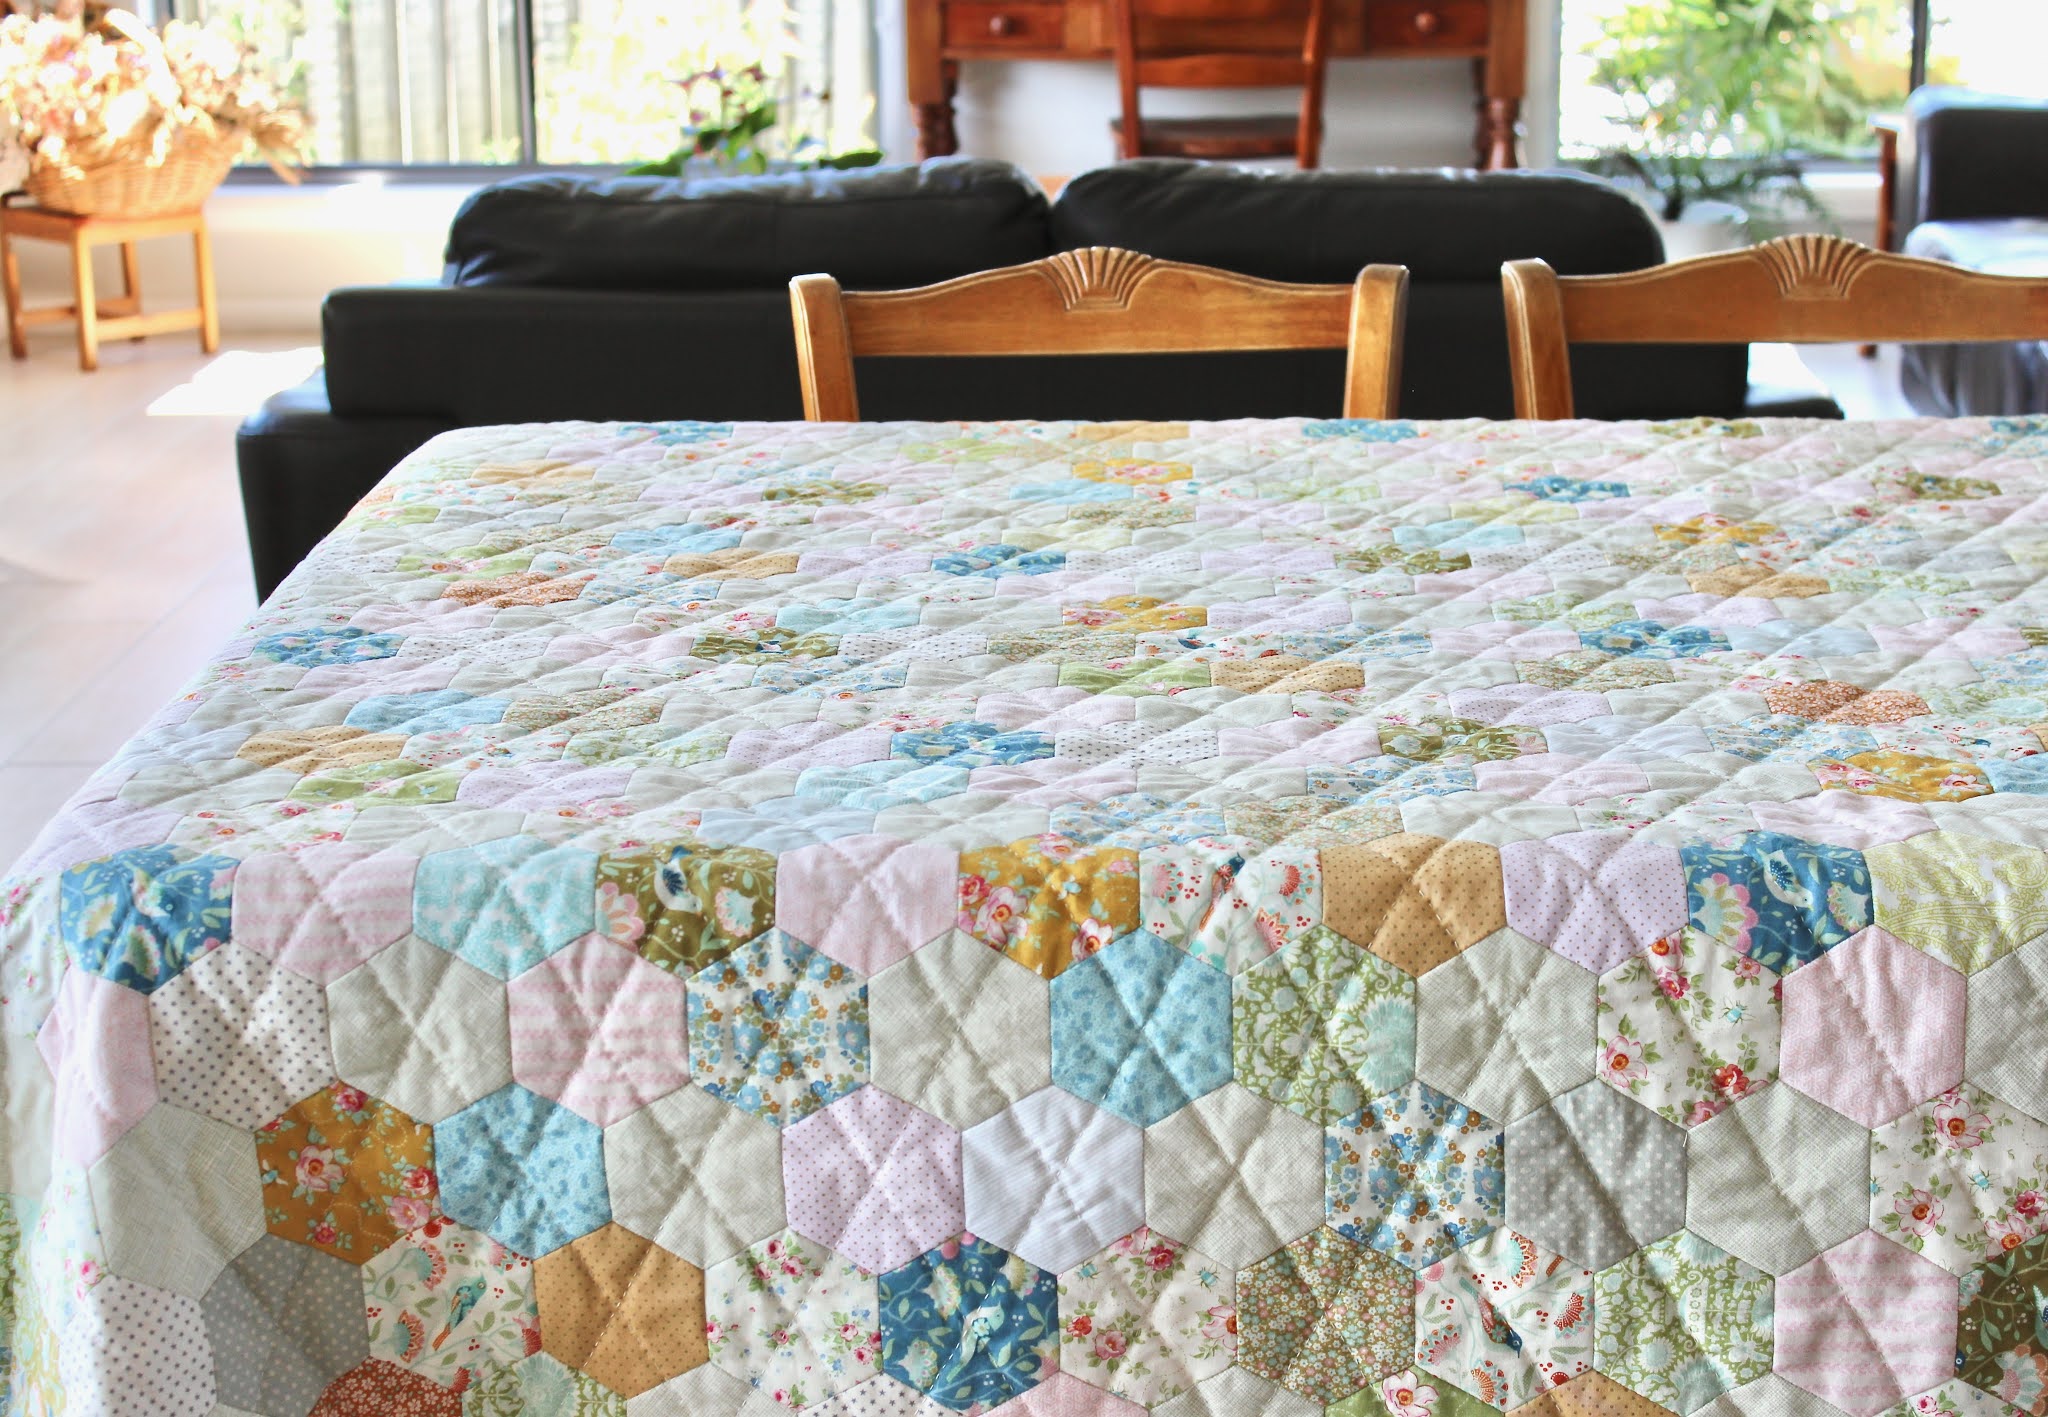
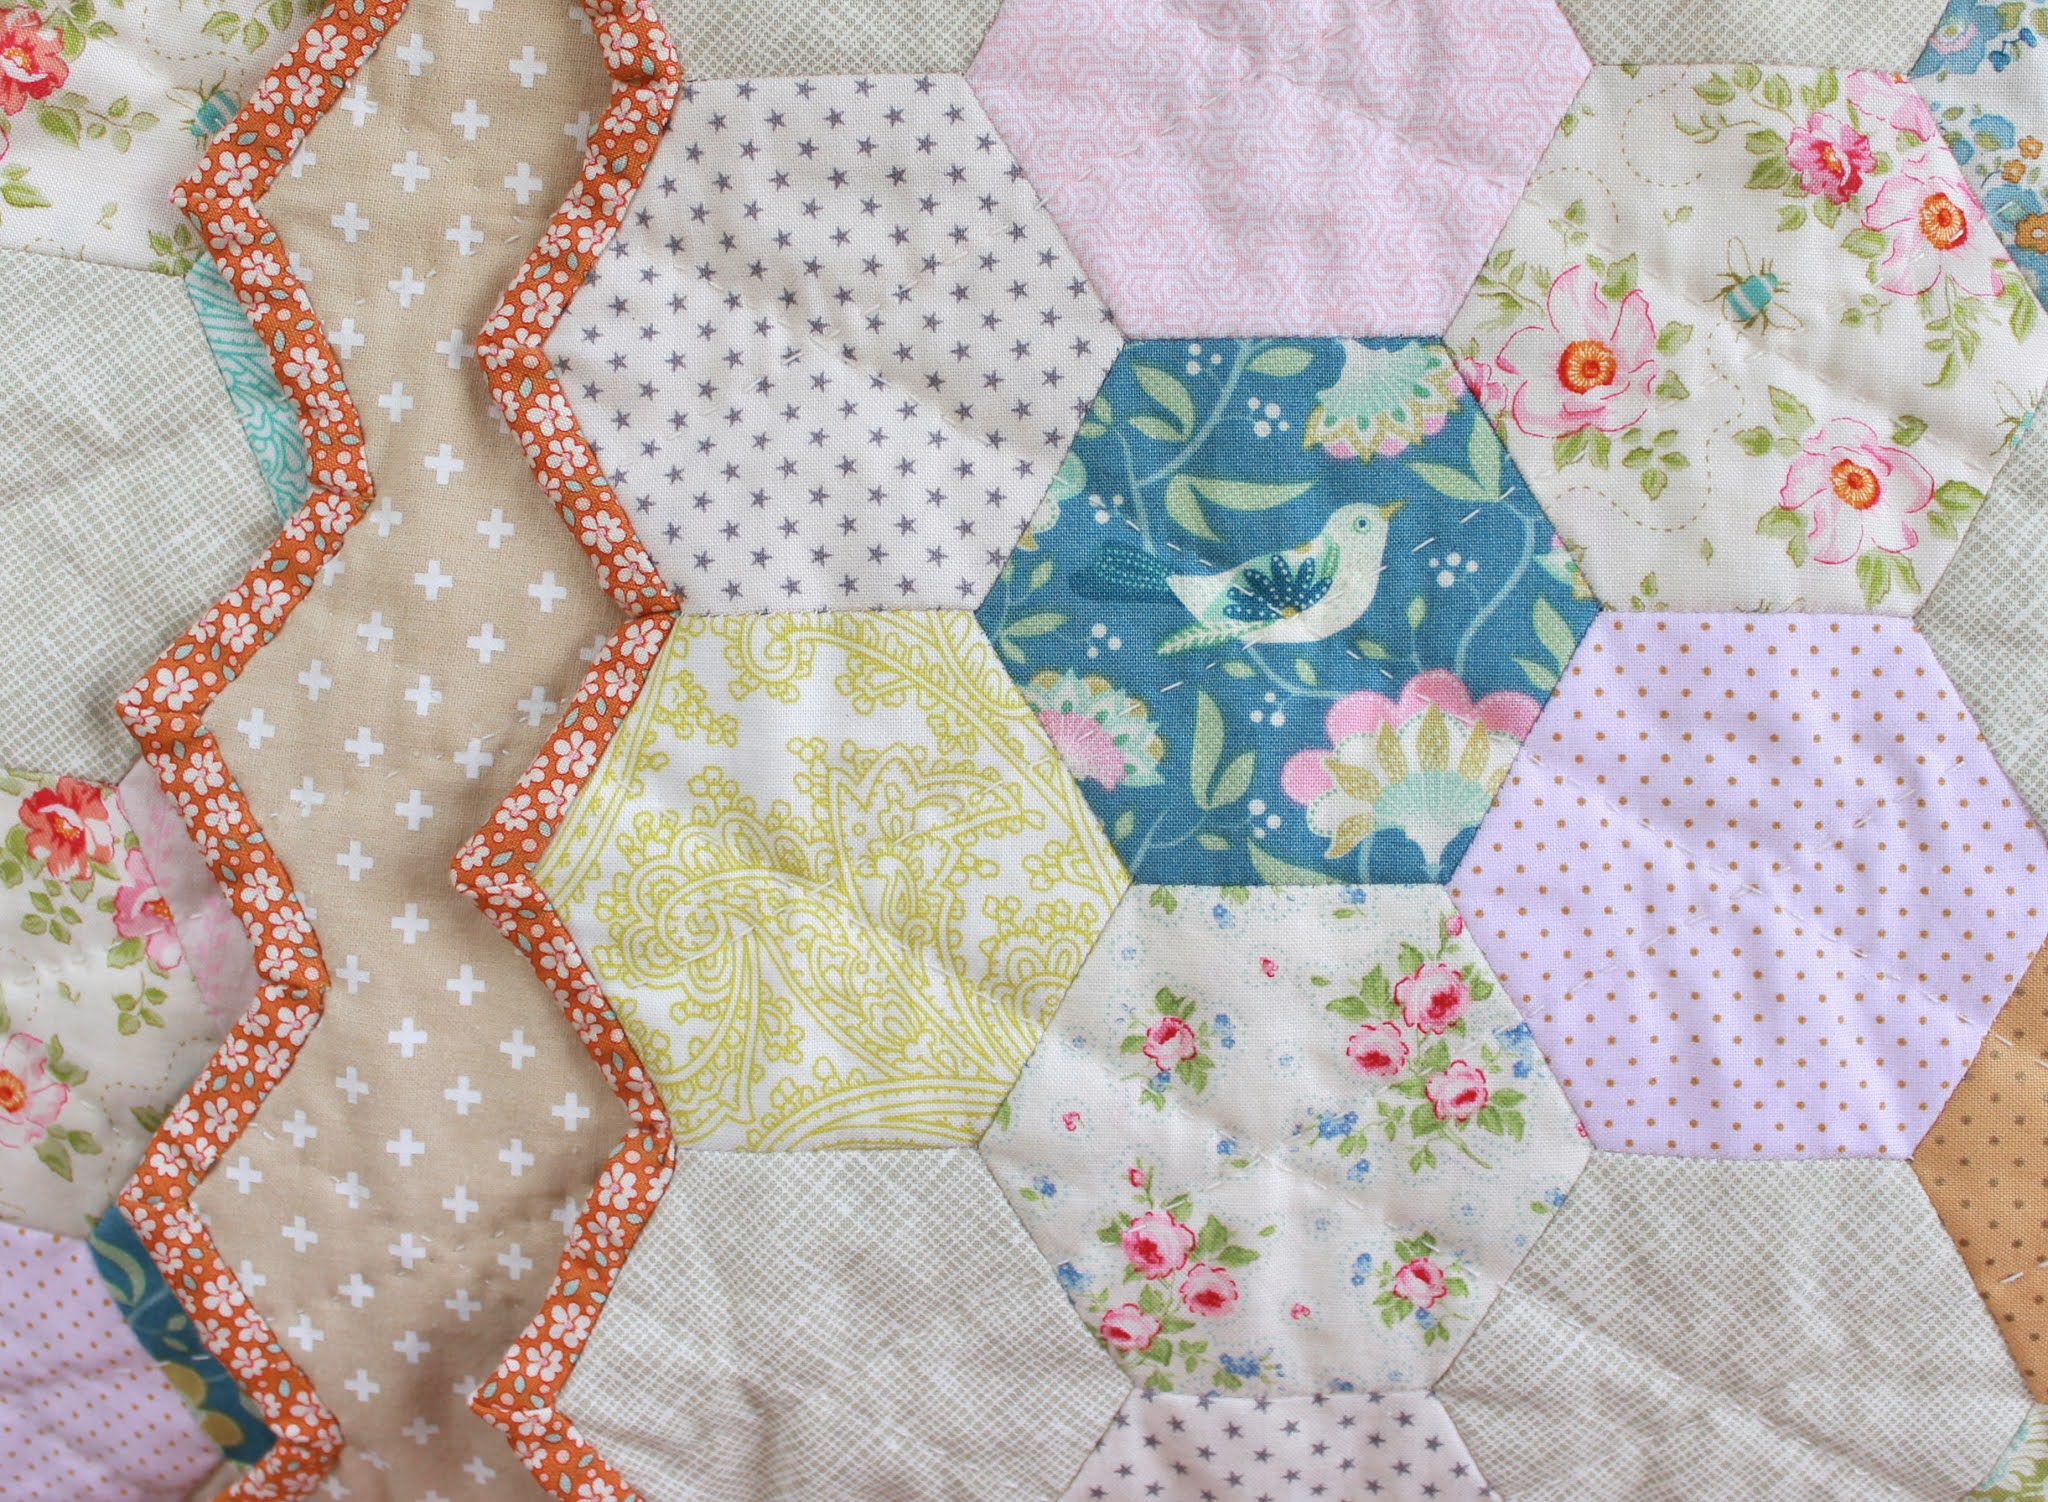
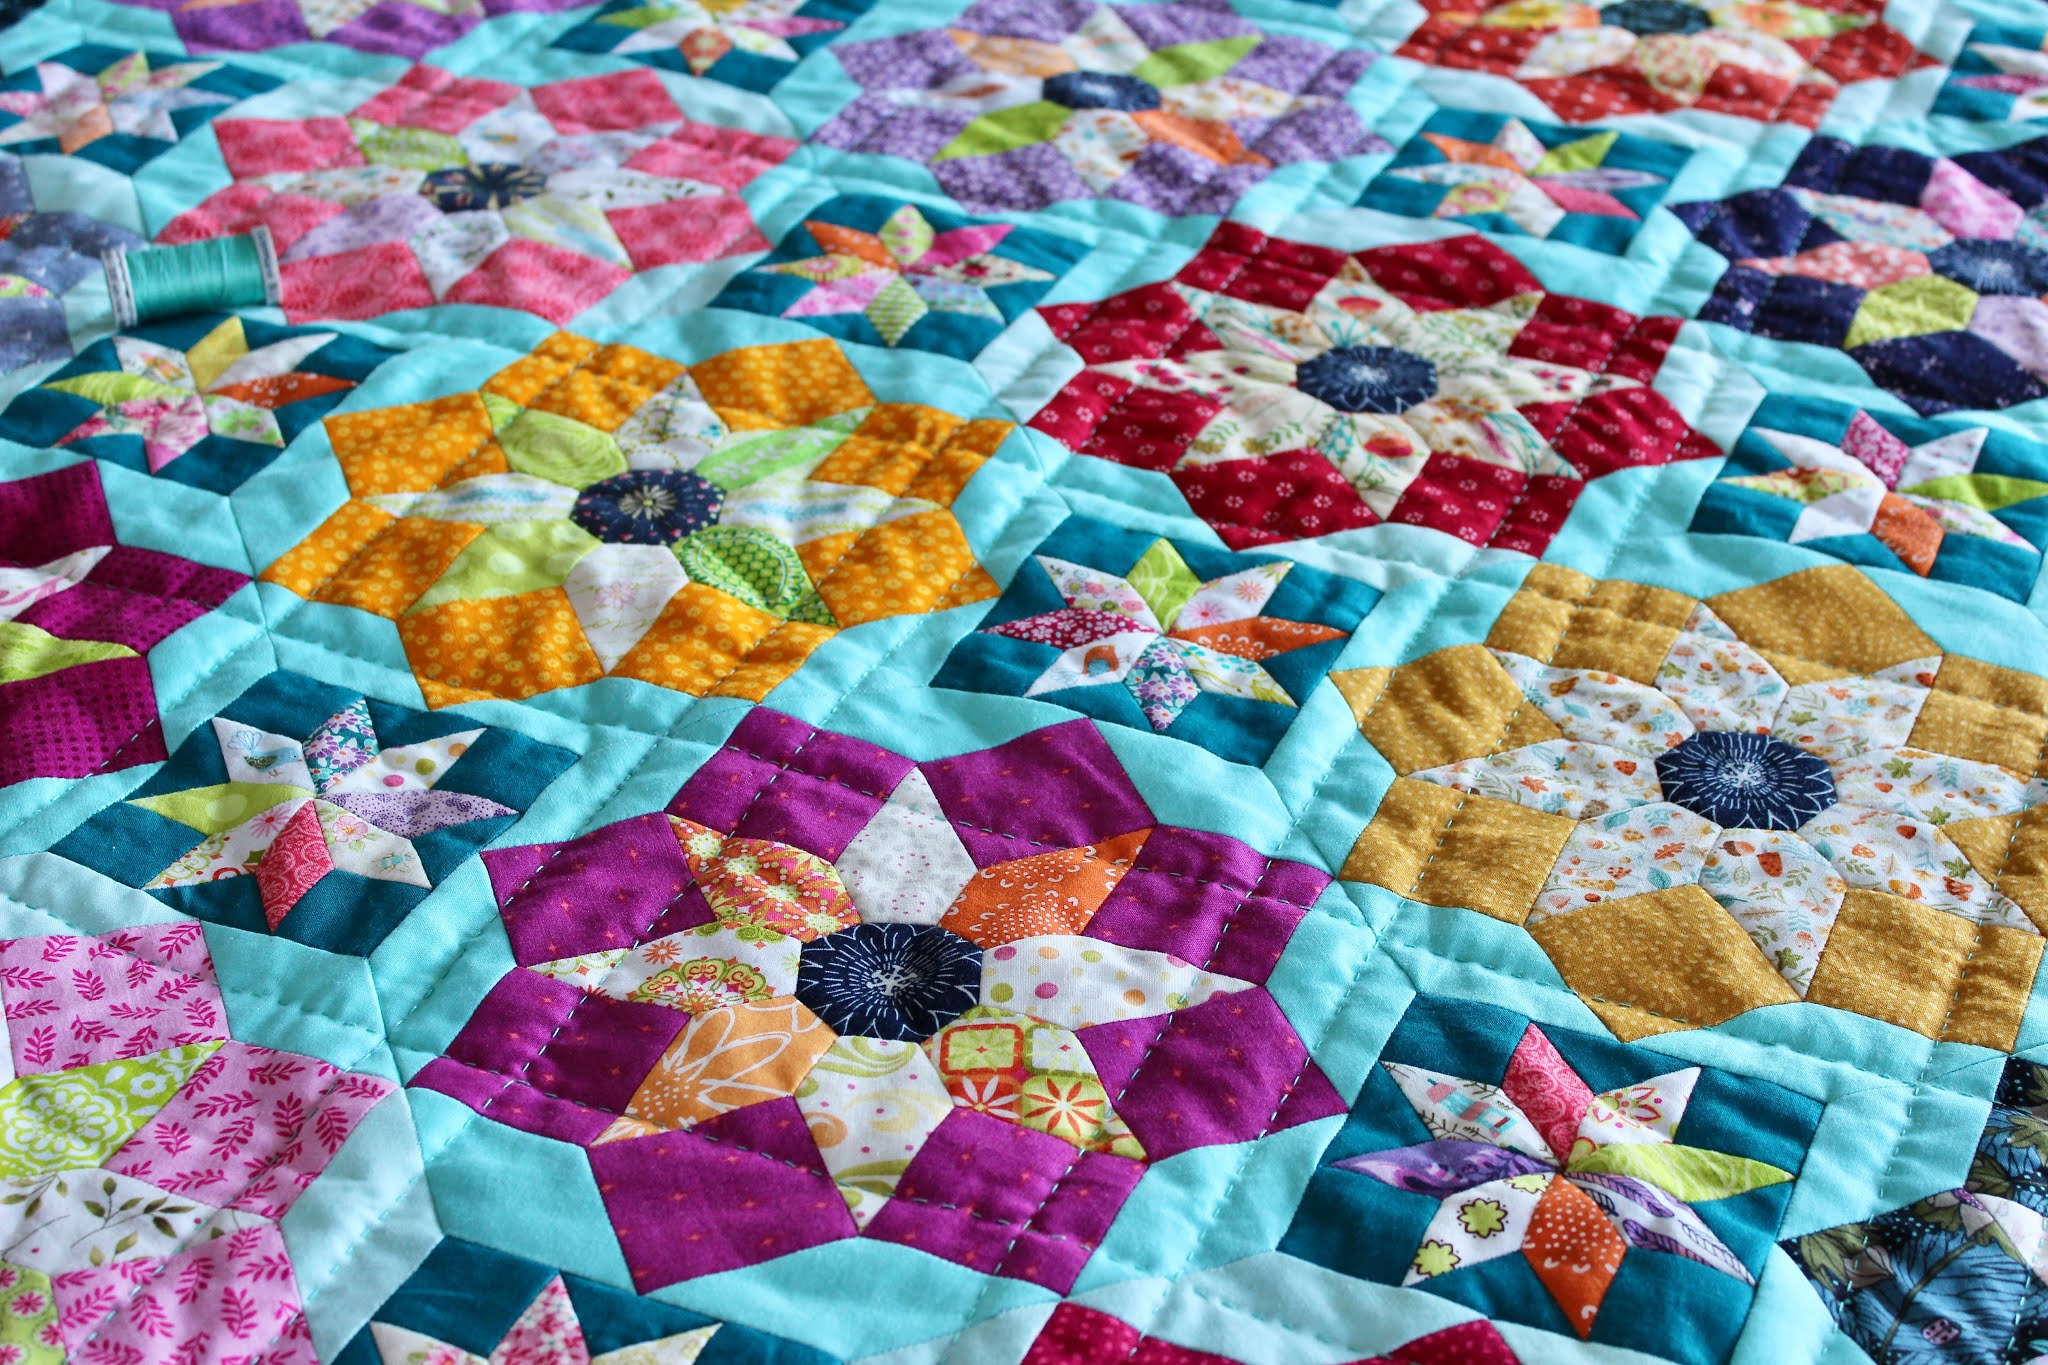
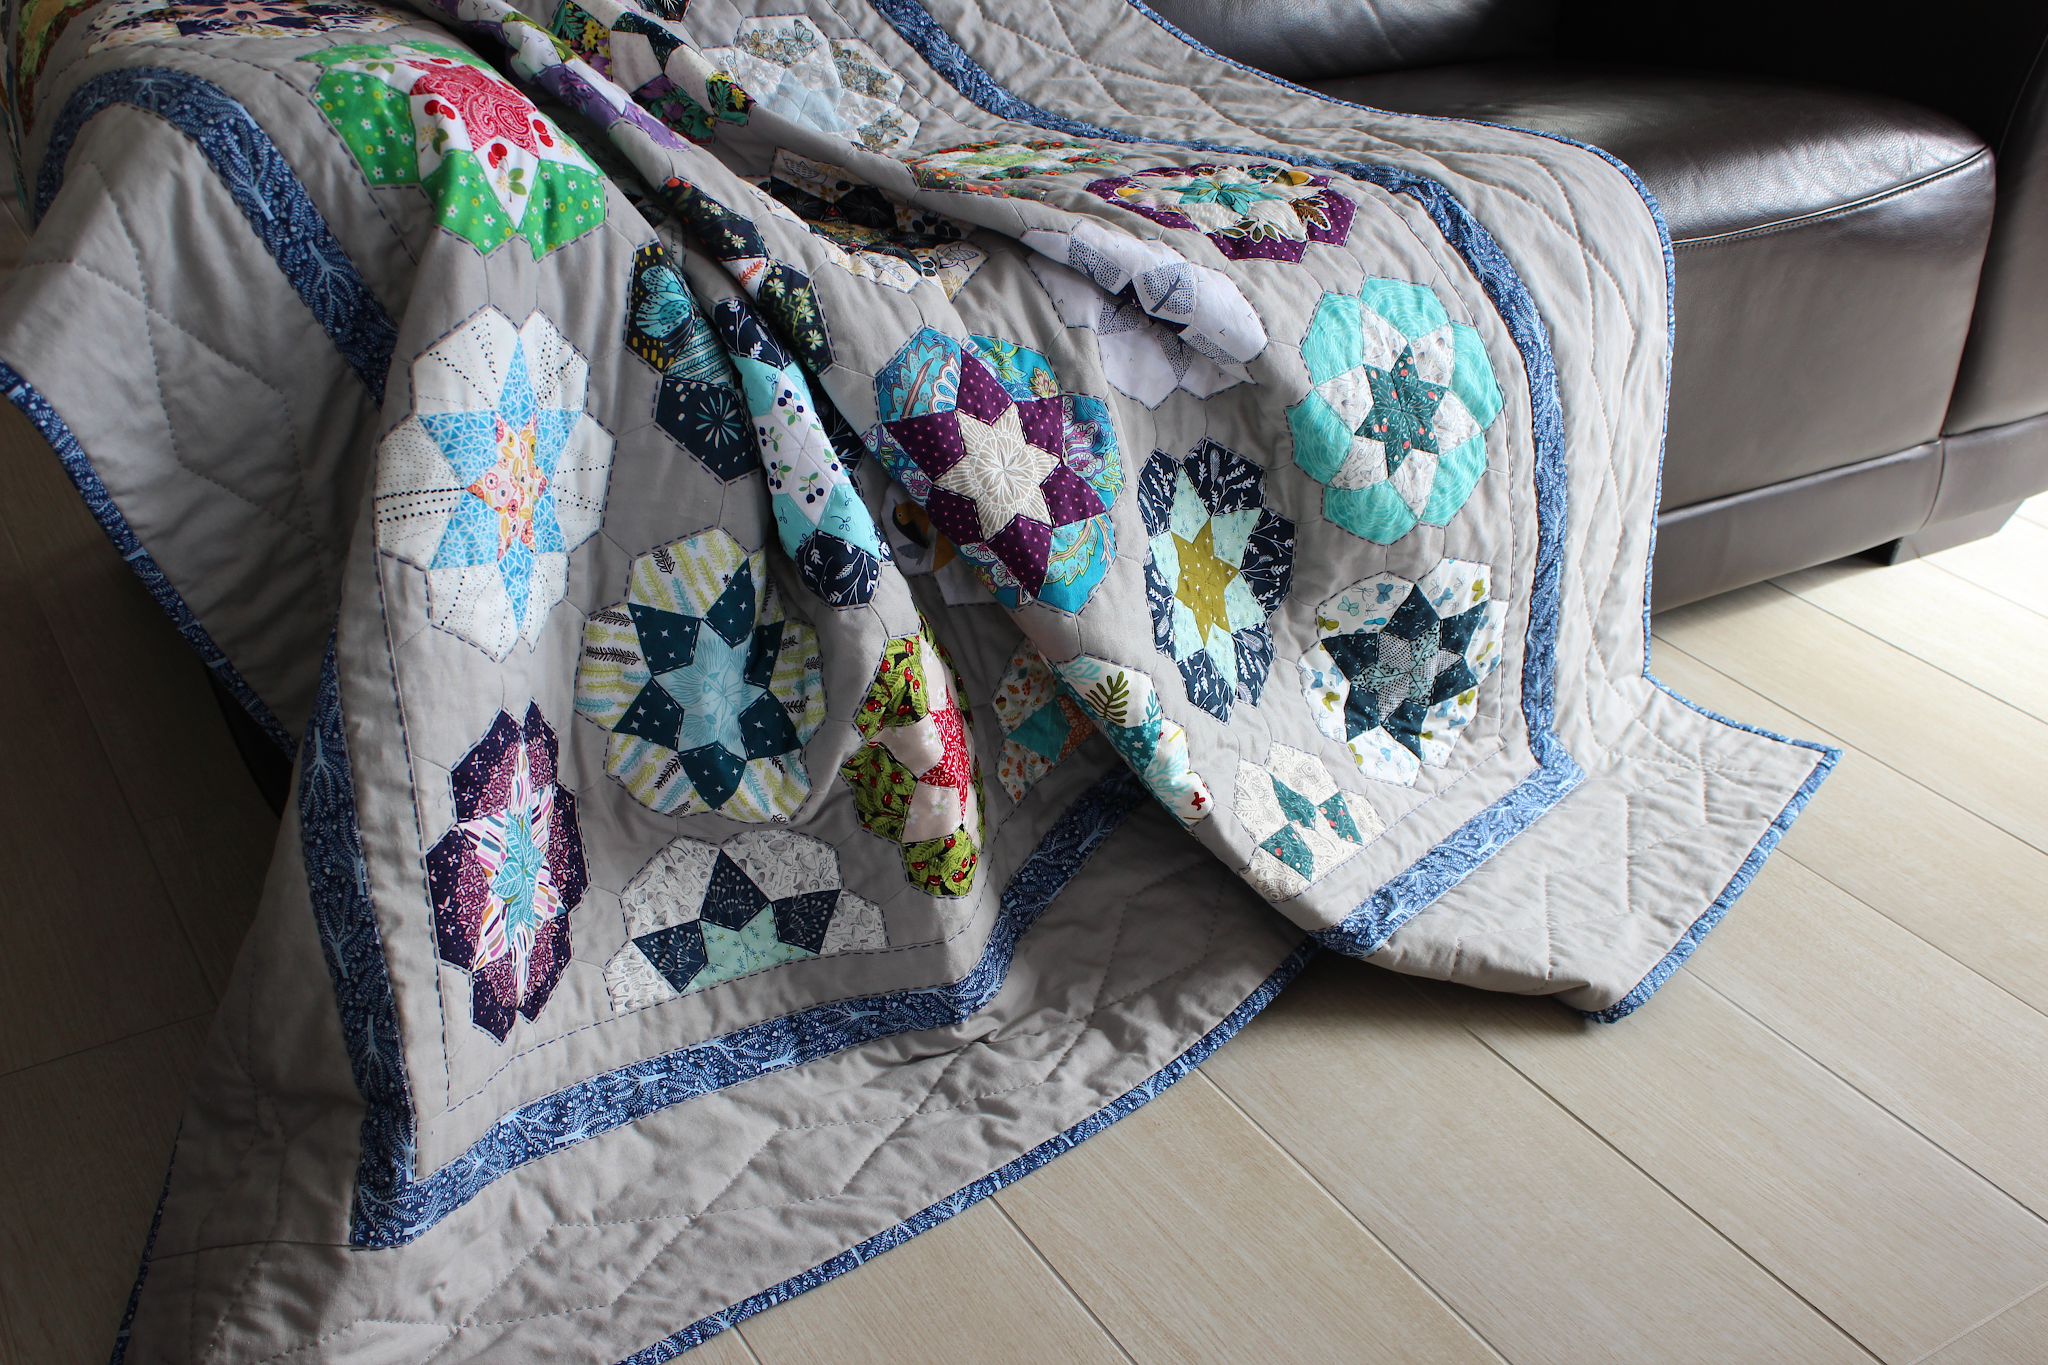
After some trial and error I settled on hand quilting using Gutermann Sulky 12 wt threads - white (1001) for outlining each of the two inner stars in every block, and a royal blue to outline the edges of each block. I found an Embroidery needle worked best for me - whichever size is finest but with an eye large enough to thread easily (I use a packet which contains sizes 5 - 10 Embroidery needles). With so many folded seams to pass through and corners to turn, I found the  stab method most effective, one half stitch at a time. I tried using a hoop early on but mostly quilted without it due to comfort and personal preference. The hand quilting took quite some time but I really like how it has highlighted each block as well as pulling the design together. Royal blue/navy is the colour of the central block, border, binding, backing and outer quilting.


The print used in the border, as well as the binding, are a favourite organic fabric, 'Sashiko Trees' or Pomegranates, from an older Cloud 9 collection named Moody Blues. The same fabric features in the very centre block. The backing fabric is also from the Moody Blues collection, one I had enough of on hand, it is nice and soft and perfectly camouflages my imperfect hand quilting on the back.

The only fabric purchased specifically for this quilt is the grey solid, which is a cheap, but hopefully durable, Prima Homespun, easily accessible from Spotlight (my only local source of solid fabrics). This quilt design has been wonderful for featuring favourite fabrics from previous quilts and sewing projects as only a small quantity of each is needed.


It was finally finished! Or was it..... As I was taking these whole-quilt photos a couple of weeks ago, I noticed the edges were a little bit wavy. I called it a finish and tucked it away for a week before I decided I really should add one last row of hand quilting, just inside the binding, which I completed last weekend. This extra line of quilting has done the trick and it now sits beautifully flat and even. 

Quilt Details
Ice Cream Soda Quilt
Block designed by Jodi Godfrey of Tales of Cloth
Setting and border design my own
Finished quilt measures 65 inches x 82 inches
165cm x 208cm
Started: January 2017
Finished: August 2020
Cotton fabrics, many are organic
Hobbs Organic cotton batting


* You can find regular updates on my sewing and every day life on Instagram: Piecesofcontentment or follow the link from the small blue camera icon in the right hand column

Related Posts Plugin for WordPress, Blogger...